Tag: club theme

Fun with Fancy Nancy Club

A colleague of mine recently introduced me to the Fancy Nancy series, by Jane O’Connor. The books are very well written and beautifully illustrated by Robin Preiss Glasser. The details on each of the pages are brilliant! They really capture the essence of what Fancy Nancy is all about. I also truly appreciate how Jane has incorporated learning and enhancing children’s vocabulary into something that is fun and exciting. Fun with Fancy Nancy Club is a club that can be fun, fulfilling, and educational all at the same time.

Week 1-Make your own Fancy Fabric Hair ribbons

Introduce the group to Fancy Nancy by reading  her  first book entitled, Fancy Nancy by Jane O’Connor

Fancy Fabric Hair ribbons

Materials needed:

  • Fun, yet sturdy fabrics
  • sparkly pony beads
  • hair ties
  • fabric cutter
  • yard stick

Directions:

1) First have an adult use the fabric cutter and yard stick to cut equal sized strips (~ 1/2 in wide. and 6 in. long)

2) Next, have the children choose fabric strips and tie simple knots to create their hair ties. Every third or fourth tie they can add a bead to make it look more fancy if they so desire. The more strips they choose, the thicker and fuller their hair tie will become.

Week 2- Fancy Decoupage Trinket Boxes

Decoupage is a fancy way of saying the art of decorating with colored paper cut-outs, paint, & glitter. I think children will truly enjoy creating their own decoupage boxes

Expected Project Time: 45 minutes-1 hour

Materials Needed:

  • Small boxes (1 per child)- small takeout boxes or margarine tubs would work well if you are on a $$, or you can purchases small cardboard boxes at a local craft store.
  • White (or Clear) school  glue & water
  • Plastic bowls
  • Paintbrushes
  • Magazines, Color Catalogs, & Newspapers
  • Scissors
  • Glitter Glue
  • Rhinestones
Side of Box
Side of Box

Directions:

1)  Spread out magazines, catalogs, and newspapers. Encourage children to cut out shapes and objects that interest them.

2)  Mix 1 part glue to 1 1/2  parts water in each plastic bowl to prepare a glue wash. Have children “paint-on” their cutouts in their desired pattern. TIP: Use only interior pages from the magazines, not covers as they will be too thick and won’t stick/lay flat against to boxes. The thinner the pages, the better ~ the more polished outcome there will be!
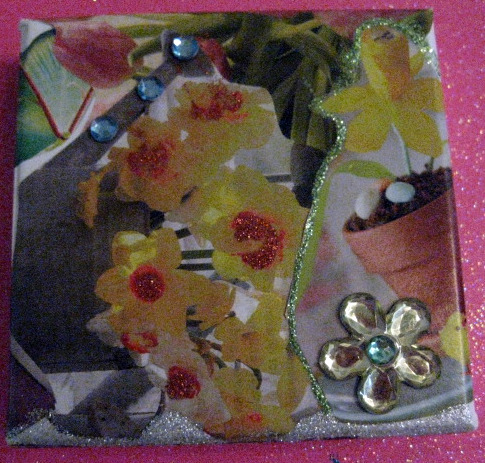
Top of Box
Top of Box

3) Allow the boxes to dry for 10-15 minutes. In the meantime you can check out FancyNancyBooks.com for some adorable printables the children can use while they are waiting. Use rhinestones & glitter glue to give their boxes an extra special fancy touch – Voila! Fancy Decoupage trinket boxes to hold all of their fancy objects! TIP: If boxes are still too wet after 10-15 minutes, skip this step and save it for the following day/week when the group next meets.

Week 3: Fancy Nancy Vocabulary Challenge

You can start this session by reading Fancy Nancy’s Favorite Fancy Words, by Jane O’Connor. Then ,depending on the ages of children in the group you can have 2 different types of challenges or use a combination of both. Have small prizes on hand for everyone who participates in the challenge. Prize Ideas: Boa Pens, Rhinestone Rings, Glittery playdoh.

Ages 9-12: Fancy Word Spelling Bee

Gather a list of fancy words (ex. accesories, boas, parasol, etc.) and challenge children to take turns spelling the words.

Ages 5-9: Fancy Nancy Vocabulary Challenge

Using the list of fancy words you have compiled have the children guess what the definitions of each word are.

Week 4: Special Event: Fancy Nancy Tea Party & Dress Up Day

This week encourage the children to dress up for the tea party and wear pearls, fancy dresses, costume jewelry, tiaras, gloves, boas, etc. One of most festive parts of a tea party is serving dainty and delicate foods, most of them being “mini” versions of their normal selves. You can serve scones and tea sandwiches (sandwiches with filling such as egg salad, chicken salad or cucumber/cream cheese, crusts cut off, cut into 4 triangular shaped pieces), small fruits & veggies and tea of course.

You can also encourage the children to discuss their club experience ~ what did they learn? What was their favorite part of the club?

For more about information about Fancy Nancy, visit FancyNancybooks.com

Looking for more club ideas? Check the club themes page for some more exciting themed-units!

Camping Club

Kids of all ages really enjoy hands on experiences and adventures. What could be more adventurous than camping? Starting an After School Camping Club with your kids can be fun, easy and educational too!

Ages recommended: 5-12

Week 1: Design First Aid Kits-

Materials needed:

Cotton balls, band aids, 1 pair of non-latex gloves per child, wet wipes, hand sanitizer, q-tips, gauze, permament markers, & washed out plastic margarine tubs.

Directions:

Explain to the children the importance of carrying a first aid kit while Camping. Have each child decorate their own first aid kit and stuff them with all the first aid supplies.

Week 2: Make Trail Mix

Teach the children about what trail mix is and why it is a popular snack for camping. Trail Mix is a combination of dried fruit, grains, nuts, and sometimes 1 or two sweet items. It is often used as a healthy well-balanced snack for camping and hiking because it’s lightweight, nonperishable, & nutritious. It gives a quick energy boost of carbohydrates such as dried fruit or granola, and sustained (takes longer to burn off) energy from nuts. **Be careful with nuts here, many children have severe allergies to tree nuts or peanuts, be sure to make sure your children do not have nut allergies or that your school is a nut free zone.

Let the children have fun mixing & matching the various components of their trail mix. Have a vote, and choose the most popular from each category:

Dried fruits: pineapples, cranberries, raisins, apricots, apples, strawberries or blueberries, or bananas

Grain: Wheat, Corn or Rice Chex, Multi-grain cheerios, or Granola

Nuts: Peanuts, Macadamia Nuts, Almonds, Cashews

Sweet: chocolate chips, yogurt chips, chocolate covered raisins, M&M’s

Week 3: Make a Camping Scene Craft and Campfire Story Writing

Craft time!!! Try making this  fun camping scene craft from Oriental Trading Company. Announce the “Campout!” for next week and allow kids to write campfire stories if they wish!

Week 4: Campout!

Make a pretend campfire rolled up brown construction paper logs & tissue paper flames. Ask in advance to see if any staff or parent if they have a tent they would be willing to let you borrow. If this is not possible, you can use sheets to cover tables to make a “tent.” Ideally try to find a grassy patch to host your campout, otherwise indoors is ok as well. Have the children bring flashlights, sleeping bags, and first aid kits and munch on the trail mix that they made. Invite the children to share the campfire stories they have written with the group. Play a few fun camping games such as “I Spy” or “Going on a Camping Trip” or sing a song the Bear Hunt Song.

Looking for more club ideas? Check the club themes page for some more exciting themed-units!

Taste of Mexico Club

My inspiration behind leading a Taste of Mexico Club came about a few years back. I was traveling in Mexico seeing the local sights and decided to take a class. Since I love all things culinary I took a class called, “A Taste of Mexico.,” hosted by a chef at a local restaurant. We learned to make salsa Mexicana, guacamole, tamales, and tacos. Once we were all finished we got to consume our delicious Mexican delights. The chef then surprised us all with awards as honorary chefs. Even as a fully grown adult I was giddy as a small child when I received my award. I wanted to share my experiences with the children I work with, and thus Taste of Mexico Club evolved!

Week 1-Hands on cooking experience: Make and Taste guacamole

The ages of children in my club were 6-11, so I had to make a few preparations beforehand such as chopping the cilantro, onions, and tomatoes and placing them in separately labeled zip lock baggies. For the avocadoes I simply cut them in half and let the children take turns scooping out the avocadoes with plastic forks into a large bowl. Once all the avocadoes were scooped into the bowl I had each child take a turn at mashing the avocadoes (I used a potato masher for this, which worked out fabulously!) Next, I assigned each student a duty to add a remaining ingredient: salt, pepper, lime, cilantro, onion, and tomatoes. Once everything was all mixed together everyone got to taste their creation. I then gave everyone an award for being a “Certified Guacamole Maker.” I also gave them the guacamole recipe to take home. One of the children loved the guacamole so much she went home and told her Dad about it. That next weekend they made it together and Dad put it out for sports party he was hosting and said, “My daughter made the best guacamole ever!”

Guacamole Recipe

Serves 15-20 kids

  • 6 avocadoes
  • 3 tomatoes, chopped
  • 2 large sweet onions, chopped
  • ½ -1 bunch of cilantro leaves, chopped
  • Salt & pepper to taste
  • The juice of 2-3 limes
  • 1 Serrano Chile, seeded & chopped (optional)

Week 2- Piñatas Part 1

To start our week I announced that we were going to make piñatas, but first we started by learning a few facts about the history of the piñata. Each child was given a medium sized balloon. We used newspaper strips & liquid starch to completely cover our balloons. (Liquid starch is hard to find these days – I scoured Target and Ralphs to no avail. My most consistent source for liquid starch is Pavilions.) Try to encourage the children to wipe away excess starch from their strips with their fingers, as the strips can easily tear if too wet. It also will not cover the balloon as well. Once complete allow the piñatas to completely dry. I like to keep them in bowls and constantly turn them when one side dries. I also try to keep a vigilant eye on them and patch any holes I see. Also, make sure the club leader makes a piñata as well to be used at the fiesta the last week.

Balloon Piñatas

  • Balloons (1 per child)
  • Newspaper strips
  • Liquid starch
  • Plastic Bowls

Week 3- Piñatas Part 2

Today we painted our piñatas. I put out green, white, yellow and green tempera paints and pencils for them to draw their design. Once completed we put them in a safe place to allow them to dry and save them for taking home Week 4.

Week 4- Fiesta Time

We had a fiesta dancing to the Mexican Hat Dance and Macarena and served quesadillas for snack. (These can easily be heated in the microwave 3-4 at a time.) I filled the leader made balloon piñata with small toys and attached a jump rope. Creating the handle can be the hardest part, but duck tape is your friend, utilize it well, otherwise not all children will get a turn at whacking the piñata. Prepare for this ahead of time by giving guidelines to the children. Ours were: 1) Each child gets 2 tries 2) Even if prizes fall out don’t grab them until the leader says go 3) Only pick up 3 prizes and then sit at the table, once everyone has 3 in their bag (and a leader has checked) then you have one more “free for all” at the prizes. Our rules worked out well but you may want to change them depending on your group dynamic. At the end of the club each child got to take home their piñata to use at their own party!

Looking for more club ideas? Check the club themes page for some more exciting themed-units!

The benefits of after school clubs

Chances are if you have ever attended, worked in, or had your child attend an after-school program you will find  daily activities such as Arts & Crafts, Homework time, inside and outside games, and snack time. These daily activities are designed to provide a safe, stable, and structured environment for children. There are times, however when this daily schedule may become somewhat of a grind leaving center staff and children wanting more. After school clubs are a way to add new life and enthusiasm into the program.

What are after-school clubs?

Clubs are a combination of all the best aspects of an after-school program. They can include games, arts & crafts, learning & special events. Typically they last 4-6 weeks and are planned by After School center staff. They are also designed to fit a certain theme. Your center staff can choose a topic/hobby that they specialize in such as dance or music or you can tap into popular children’s themes.

Example Club Theme & Activities:

Taste of Asia Club

Week 1: Dragon Wands

Week 2: Make Candy Sushi

Week 3: Kung Fu Panda Frames

Week 4: Taste Asian food- Sushi, egg rolls, & Orange Chicken and watch the movie Mulan.

Related Posts with Thumbnails